Board Prototyping in ISequenceSpec™
Introduction
There are various stages in printed circuit board design flow. Board prototyping is an integral stage before product development stage. In this stage, engineers undertake various experimentations to achieve the desired results to develop the hardware as per their specifications.
Considering the importance of this, Agnisys came up with a solution to automatically generate sequences for boards. To make our tool, ISequenceSpecTM (ISS), compatible for different boards, we came up with output ‘iss_platform’. It is a generic approach which will enable engineers to create a golden sequence that can be run on various boards. This output will be basically a ‘.c’ output but with the board specific fuctions.
In ‘Configuration’ settings, tool provides flexibility to mention the board type, base address, register read/write APIs, initialization and cleanup functions. Along with this, user can also alter the return type of function and default data types of arguments, constants and variables.

- In Board Type, user will mention the type of boards on which the user will be running the sequences on. It is essential to have so that requisite libraries related to that particular board can be included in the generated firmware code.
- Board Base Address specifies the address at which the IP, on which sequences are to be run, is placed on board.
- In Initialization and cleanup text box, user will mention the corresponding functions.
- In Reg Write and Reg Read text box, user will mention the APIs used for reading/writing the registers.
- Expected Output


- Conclusion
Board prototyping helps engineers and different teams within the company to have better understanding of the design intent. Validating a design before developing it, is highly beneficial. To make ISS compatible with boards, Agnisys came up with the solution of having single golden specification for sequences that can be run on various boards.
Field Error signal
Introduction
Error signals plays a very vital role in designing and verification. In UVM, error is automatically generated if we try to write a readable register/field or read a writable register/field. To bring in the same functionality in RTL, IDS creates certain error signals. So, in case of RTL, IDS generate read and write error for register and field based on their software access. Write error for registers or fields are generated when master tries to do write transaction on a readable register. Similarly, read errors are generated when master does read transactions on writeable register or field.
In case, if register has multiple number of fields with each having different software access(ro/wo) then it signifies that register is both readable and writeable. So, in that scenario, IDS do generate the error signal at field level if invalid transaction is attempted on it.
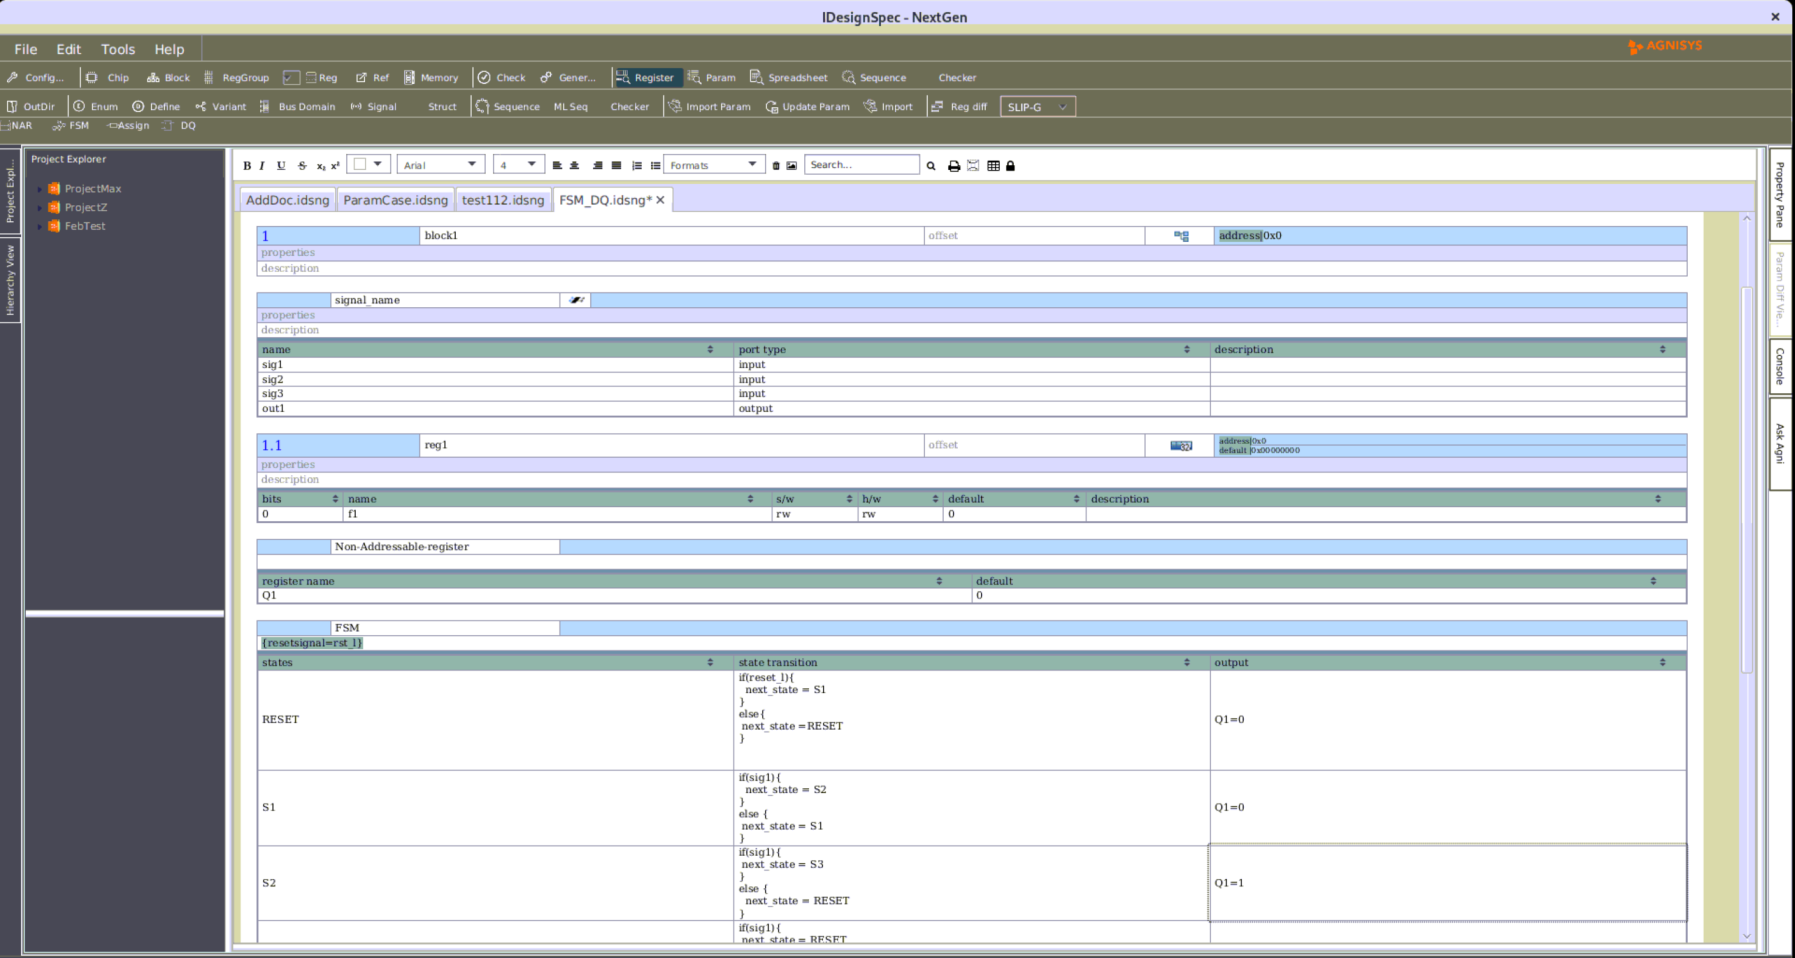
User can generate read/write error for field in RTL using IDS as shown below in Figure 1:

igure1. Specification for read/write error in IDS
The above implemented property for field read/write error will make the following RTL code:

Conclusion:
Therefore, field error is very important in terms of register has multiple number of fields with each having different software access. So, this way user can get acknowledge of transaction failure for invalid transaction.
Traceability in IDesignSpec™
It is often difficult to trace various outputs, for different components. Usually, in a specification, which contains thousands of registers, sub-blocks, or IPs, a mechanism like traceability would be of great help. It enables designers to trace the effect of any component in different outputs. This feature in IDesignSpec helps in implementing and maintaining traceability throughout the specification up to the generated output. The output can be of different formats such as RTL, UVM, HTML and C-Header with respect to the chip level specification.
The traceability report is generated in HTML format so that the user can navigate between various outputs using a browser. In the traceability report, the generated outputs – RTL, UVM, C-Header and HTML – are represented in the form of an HTML table.
The user needs to provide the ‘req id’ (reqid=<id>) and description to add the elements in the table. The components having same reqid indicate that they belong to the same category and can be grouped together in the HTML report. Selecting an output for a component points to the location of that component in the code.
For example,
- Consider a chip with multiple components such as signals, blocks, register groups, and registers.
Each component is specified with a ‘reqid’ which is given in the description of the IDS template.
After running the testcase along with the “-traceability” switch, the following traceability matrix is generated. When the user clicks on the hyperlink shown in the figure above, then it will take the user to the desired output for the corresponding component of the particular reqid. A file name with <<input filename>-Table.html> will be generated in the output directory,
A sample of the traceability matrix is shown below. The ‘Traceability Matrix’ is a document that co-relates any two outputs and can be used to track the requirements. It also aids in checking if the current project requirements are met.
It indicates the output window index
The output for a block is indicated after the user select the Block RTL output from the traceability matrix.
For more information about the how the traceability feature can help to trace the components interconnected to each other and show interconnection of internal codes of different types like Verilog, HTML, C-Header, etc. contact the Agnisys support team.
Verification Constructs in SystemRDL 2.0
SystemRDL is a textual representation of hardware-software interface comprising of addressable registers, interrupts, counters etc. The latest version of SystemRDL – version 2.0 was released in 2018 and includes new verification constructs, parameterization, data types etc. to name a few.
This article will showcase examples about the verification constructs natively supported by SystemRDL 2.0 along with its syntax and the UVM output code generated by IDesignSpecTM.
HDL PATH:
By specifying ‘HDL path’, the verification environment can have direct access to the memory, register, and field implementation nets in a Design Under Test (DUT).
An hdl_path_slice or hdl_path_gate_slice can be put on a field or mem component. It can be used when the corresponding RTL or gate-level netlist is not contiguous.
Syntax:
hdl_path = “path“;
hdl_path_gate = “path“;
hdl_path_slice = ‘{“path” [, “path”] *};
hdl_path_gate_slice = ‘{“path” [, “path”] *};
| Property | Description | Dynamic |
| hdl_path | Assigns the RTL hdl_path for an addrmap, reg, or regfile | Yes |
| hdl_path_slice | Assigns a list of RTL hdl_path for a field or mem | Yes |
| hdl_path_gate | Assigns the gate-level hdl_path for an addrmap, reg, or regfile | Yes |
| hdl_path_gate_slice | Assigns a list of gate-level hdl_path for a field or mem | Yes |
SystemRDL Example:
addrmap blk_def # (string ext_hdl_path = “ext_block”){
hdl_path = “int_block” ;
reg {
hdl_path = { ext_hdl_path, “.externl_reg” } ;
field {
hdl_path_slice = ‘{ “field1” } ;
} f1 ;
} external external_reg ;
reg {
hdl_path = “int_reg” ;
field {
hdl_path_slice = ‘{ “field1” } ;
} f1 ;
} internal_reg ;
} ;
addrmap top {
hdl_path = “TOP” ;
blk_def #( .ext_hdl_path(“ext_block0”)) int_block0 ;
int_block0 -> hdl_path = “int0” ;
blk_def #( .ext_hdl_path(“ext_block1”)) int_block1 ;
int_block1 -> hdl_path = “int1” ;
};
UVM Code:
. . . . .
. . . . .
this.clear_hdl_path();
this.add_hdl_path(“TOP”);
intblock0.clear_hdl_path();
intblock0.add_hdl_path(“”);
intblock0.externalreg.clear_hdl_path();
intblock0.externalreg.add_hdl_path_slice(“ext_block0.externl_regfield1”, 0, 1);
intblock0.internalreg.clear_hdl_path();
intblock0.internalreg.add_hdl_path_slice(“int_regfield1”, 0, 1);
intblock1.clear_hdl_path();
intblock1.add_hdl_path(“”);
intblock1.externalreg.clear_hdl_path();
intblock1.externalreg.add_hdl_path_slice(“ext_block1.externl_regfield1”, 0, 1);
intblock1.internalreg.clear_hdl_path();
intblock1.internalreg.add_hdl_path_slice(“int_regfield1”, 0, 1);
lock_model();
endfunction
endclass : top_block
`endif
. . .
. .
Constraint:
A constraint is a value-based condition on one or more components; e.g., constraint-driven test generation allows users to automatically generate tests for functional verification.
Definitive definition
constraint constraint_component_name {[constraint_body]};
constraint_component_name constraint_inst;
Anonymous definition
constraint {[constraint_body]} constraint_component_name;
| Property | Description | Dynamic |
| constraint_disable | Specifies whether to disable (true) or enable (false) constraints | Yes |
SystemRDL example:
constraint max_value { this < 256; };
enum color {
red = 0 { desc = ” color red “;};
green = 1 { desc = ” color green “;};
};
reg register1 {
field {
} limit[0:2]= 0;
field {
max_value max1;
} f1[3:9]= 3;
field {
encode=color;
constraint{this inside{color::red,color::green};}rg1;
} f2[10:31];
};
addrmap constraint_component_example {
register1 reg1;
register1 reg2;
reg2.f2.rg1->constraint_disable = true;
};
UVM Code:
. . .
. .
class constraintcomponentexample_reg1 extends uvm_reg;
`uvm_object_utils(constraintcomponentexample_reg1)
typedef enum {
reg1_f2_e_red = 0, // color red
reg1_f2_e_green = 1 // color green
} reg1_f2_e_color;
rand uvm_reg_field limit;
rand uvm_reg_field f1;
rand uvm_reg_field f2;
constraint reg1_f1_constraint
{
f1.value[6:0] < ‘h100;
}
constraint reg1_f2_constraint
{
f2.value[21:0] inside {‘h0,’h1};
}
. . . . . .
. . . . . .
endclass
`endifa
Structural Testing:
1) dontcompare: This is a testing property which indicates the components read data shall be discarded and not compared against the expected results.
2) donttest: This testing property indicates the component is not included in structural testing.
SystemRDL example:
addrmap top{
reg r1{
dontcompare;
field{
} fld1;
};
reg r2{
donttest;
field{
} fld1;
};
r1 r1 @0x0;
r2 r2 @0x8;
};
UVM Code:
`ifndef CLASS_top_r1
`define CLASS_top_r1
class top_r1 extends uvm_reg;
`uvm_object_utils(top_r1)
. . .
. .
virtual function void build();
this.fld1 = uvm_reg_field::type_id::create(“fld1”);
this.fld1.configure(this, 1, 0, “RW”, 0, 1’d0, 1, 1, 0);
this.fld1.set_compare(UVM_NO_CHECK);
. . .
. .
class top_r2 extends uvm_reg;
`uvm_object_utils(top_r2)
. . .
. .
virtual function void build();
this.fld1 = uvm_reg_field::type_id::create(“fld1”);
this.fld1.configure(this, 1, 0, “RW”, 0, 1’d0, 1, 1, 0);
uvm_resource_db#(bit)::set({“REG::”, this.get_full_name()}, “NO_REG_TESTS”, 1, this);
For a register having the property “dontcompare”, IDesignSpec sets the set_compare function value to “UVM_NO_CHECK” for the respective register in the RAL Model. This disables the register value checking in case of a mirror sequence on the register.
In the case of a register having property “donttest” IDS sets “NO_REG_TESTS” in the uvm_resource_db in the RAL Model. The user can use “NO_REG_TESTS” key to disable test sequences on these registers.
These are some of the verification constructs added in SystemRDL 2.0. Amongst the constructs mentioned – hdl_path and constraint – was contributed by Agnisys.
We believe SystemRDL needs to evolve further in terms of scope of verification constructs. However many other important functionalities such as coverage, changing class names etc. along with various other such properties can still be represented in SystemRDL with the help of UDP (user defined property) which the IDesignSpec SysetmRDL compiler understands and automatically generates the desired output.